


Oh my, look at that amazing WordPress website you have created on your localhost. I must say you have got some great skills. Unfortunately, I am a developer so I haven’t that much knowledge of designing as per your comparison. But I can help you making your WordPress website live from local server. Common let’s do some work.
After finishing your work on your local server, the next step is to move your website from your computer to live site and let everyone see your creation. In this blog you will learn how to move WordPress from local server to live site.
I will explain you the easiest and fastest way to move WordPress from local server to live website (step by step). This method will work on every platform. No matter you are using Windows or Mac, XAMPP or MAMP.[/vc_column_text]
Before You Proceed
To move WordPress website from local to live, you need to have things on place.
First of all, make sure you have a proper ready to run website on your local server and you must have the administrative control as well (wp-admin access).
Secondly, you need a domain and a web hosting. If you are confused, we will help you to choose the best hosting provider. Some of the renowned web service providers are:
- Godaddy
- Bluehost
- HostGator Cloud
- Inmotion
- Big Rock etc.
You can simply visit their website and purchase your web space and domain name as well.
For my website, I am using Godaddy web hosting.
Once you have a domain name, a web hosting and your website in ready to go condition, all you need is FTP program, so you can upload your content to the live site.
Don’t have a FTP program??
Don’t worry I have a solution for this case. If you are not familiar with FTP program like FileZilla, you can use the universal way to uploading file from your local server to live.
To do so, you need the access of you hosting panel or cpanel. In other words, the login id and password to your web hosting.
Ready?
Let’s start uploading your WordPress from local to live site.
Step 1: Exporting local server database from phpMyAdmin
Remember the database you have created while installing WordPress?
Yes, now you need that database because all your post and pages are stored in that database.
So, go to your phpMyAdmin dashboard by typing http://localhost/phpmyadmin/ and click on the database you are using for your current website.
Next click on the “Export” button from the menu, found on the top of your computer screen.


Here you will find two option “Quick” and “Custom”. Choose “Quick” and hit the “Go” button.


Your database is now downloading.
Step 2: Exporting local files and upload WordPress files to live site
Your database is ready now. Next, you need the WordPress files in order to make WordPress site live. Here we are going to upload our local files on the live server. To do so, you need the access of hosting account or FTP details. I have mentioned the both method so you can upload your files without any hassle.
I have FTP Details.
Go ahead and open your FTP Client and connect to your server with correct hostname, username and password.
Once connected, select your all files and simply drag and drop or choose upload option on right click.


I have hosting login/cpanel
Login to your cpanel account by typing your domainname.com/cpanel and click on the “File Manager”.


Now click “public_html”. This is the root folder for your domain. We are going to upload our files inside this folder.
So, go to your XAMPP or WAMPP folder where your WordPress files are and make a zip file of all your files.


In my case, I am zipping my “test” folder.
Now roll back to your cpanel account. Click on the “upload” button and upload your zip file here.


You can simply drag n drop or select file.


Cool, your files are being uploaded now. Wait until it gets completed.
Once done, click on the “Go back” button or simply refresh your cpanel. You will find your folder there. Now select your folder and click “Extract” button from the top menu list and click “Extract Files”.


Once done, go inside your folder and select all files there and click on the “Move” button.
NOTE: Make sure the path will be “/public_html” only.


Cool, we are all set now. If you visit your site now, you will find and error “Error establishing database connection”. Don’t worry we are going to kill this error in our next step.
Step 3: Creating MySQL database for live site
Fall back to your cpanel home where File Manager and other option were located.
Scroll down to database section where you will find phpMyAdmin and other database options. Click on MySQL Database


In next step create a database by entering a name and hit the “create database” button.


After successful creation of the database, scroll down to the MySQL User section and create a new user.


After this step you need to assign this user to the database you have created in the previous step. Scroll to the “Add User to Database” and select the database you have created from the dropdown list and the user as well. Click “Add” button.
On the next screen cPanel will take you to set MySQL privileges for that user. Grant all privileges to the user and click “Make Changes”.


Step 4: Importing WordPress Database on Live Site
Now we have all things on place. All we need to do is to just plugin each part in a row.
Go to your cpanel dashboard and scroll to the database section. Click on the phpMyAdmin.
Once screen is open, select your database, you have just created, from the left menu and click on the “Import” option from the top menu.


On click of the Browse button select the database file we have exported in our first step.
Lastly click on the “Go” button and wait until phpMyAdmin importing your database.
Step 5: Setting up the Site URLs
In the next step we are going to replace our local site URL to our brand new domain name.
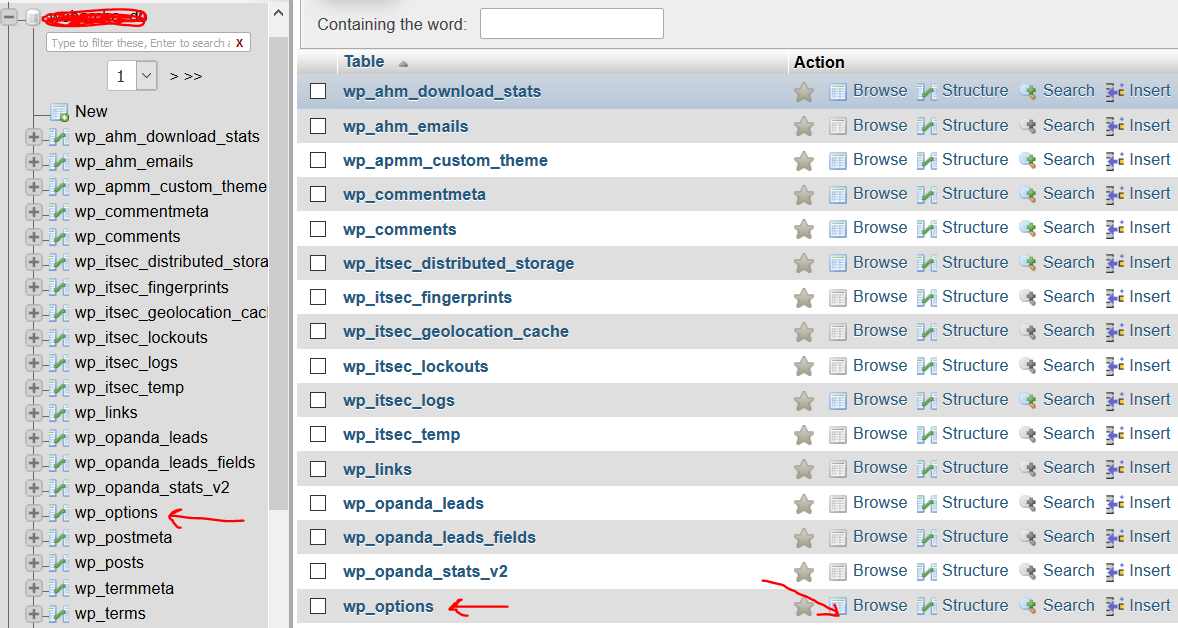
So, click on your database and select the “wp_options” table from database table list.
Click on the browse button next to the table.

In this screen look for “siteurl” and “home”.
Click on the ‘edit’ icon and replace the pre filled link (like: http://localhost/test) with your domain name (for example: https://webarchers.com)


Be careful while editing the URL make sure there will be no extra space.
After replacing your site URL click on “GO” button.


Do the same for “home”.
If you lost simply click on the “wp_options” table located on the left of your screen and then find “home”.
Step 6: Connect live database to your live site
Now we are just one step behind. So, without wasting time let’s finish this.
Leave your current screen for a while and go back to your cpanel dashboard. Then go to “File Manager” and then “public_html” folder.
Look for the wp_config file and edit it.


All you need to do is replace the database name, username and the password with the current credentials we have just created in our 3rd step.


Do not perform any extra activity.
Phewww, we worked a lot, now its time to visit your site. Your site is live now.
If your other pages are not opening up, don’t panic. Login to your wp-admin dashboard and go to Settings » General. You have no need to change anything, scroll to the bottom and click the Save Changes button.
Now the rest of your page will be live as well.
Step 7: Fixing broken images and path
There might be possibilities that images on your site are not showing up.
This is usual. You need to run an SQL query and this will fix everything for you.
Copy and paste the query below in your phpMyAdmin SQL section.
UPDATE wp_posts SET post_content = REPLACE(post_content, 'localhost/test/', 'www.yourlivesite.com/');


That’s all my friend. You have successfully migrated your WordPress from local to live site.
I tried to explain everything in very simple and easy way. But if still you face any issue, feel free to ask me.
Just leave your issue in the comment box and I will get back to you soon.
If this article helped you then please do me a favour and like us on Facebook and subscribe our YouTube channel.
Till then. Happy Coding.