


Hello Archers, most of the time it often requires grabbing user attention on some particular section of content. For these types of requirements, a slide-out panel, modal view are efficient. Today, I came across a task where I need to open a sliding modal popup in Magento 2 on the custom button. Although I already used Magento 2 default popup on the frontend but not on the backend. So, while terminating my task, I created a short and efficient guide to add a sliding popup in Magento 2 with some custom content. You can also use this popup to post your request using AJAX.
Concern: I am trying to add a custom button on the Product edit page and on that button click I will open a popup with some field/content in it.
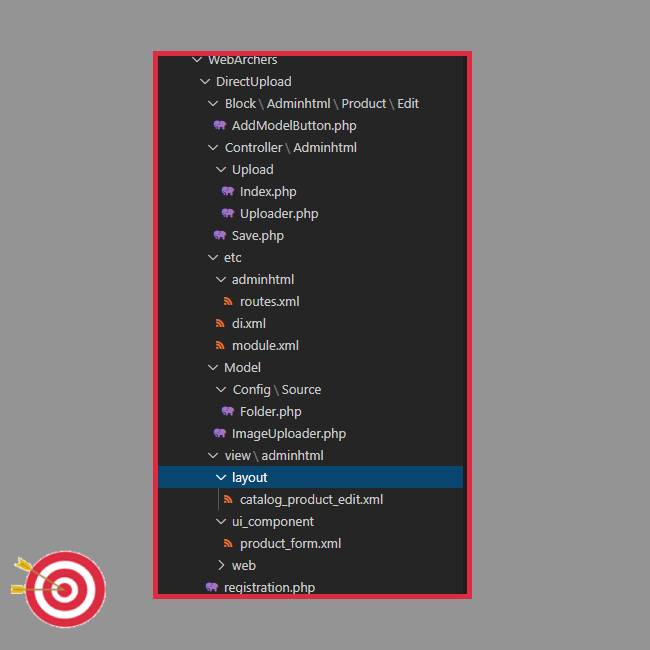
Note- I assume you already created a Custom module. Learn how to create a custom module in Magento 2. In my case, here is my directory structure.

Adding a custom button in magento 2 admin
As I mentioned earlier, I am adding a custom button in the Magento Product edit page to open a slide-out modal. For this purpose, I need to make some changes in a product-form.xml file,
Add the following code at
app\code\WebArchers\DirectUpload\view\adminhtml\ui_component\product_form.xml
<?xml version="1.0" encoding="UTF-8"?>

<form xmlns:xsi="http://www.w3.org/2001/XMLSchema-instance" xsi:noNamespaceSchemaLocation="urn:magento:module:Magento_Ui:etc/ui_configuration.xsd">
    <settings>
        <buttons>
            <button name="openModel" class="WebArchers\DirectUpload \Block\Adminhtml\Category\Edit\AddModelButton"/>
        </buttons>
    </settings>
    <modal name="test_model">
        <settings>
            <options>
                <option name="buttons" xsi:type="array">
                    <item name="0" xsi:type="array">
                        <item name="text" xsi:type="string">Done</item>
                        <item name="class" xsi:type="string">action-primary</item>
                        <item name="actions" xsi:type="array">
                            <item name="0" xsi:type="array">
                                <item name="targetName" xsi:type="string">${ $.name }</item>
                                <item name="actionName" xsi:type="string">actionDone</item>
                            </item>
                        </item>
                    </item>
                </option>
                <option name="title" xsi:type="string">CUSTOM MODEL</option>
            </options>
            <onCancel>actionDone</onCancel>
        </settings>
        <fieldset name="general" sortOrder="10">
            <settings>
                <label/>
            </settings>
            <field name="test1" sortOrder="10" formElement="input">
                <settings>
                    <dataType>text</dataType>
                    <label translate="true">Test 1</label>
                    <dataScope>test1</dataScope>
                    <validation>
                        <rule name="required-entry" xsi:type="boolean">true</rule>
                    </validation>
                </settings>
            </field>
            <field name="test2" sortOrder="20" formElement="textarea">
                <settings>
                    <label translate="true">Test 2</label>
                    <dataType>text</dataType>
                    <dataScope>test2</dataScope>
                </settings>
            </field>
        </fieldset>
    </modal>
</form>
As you can see, in the above code we have two main tags- settings and modal tag. While declaring the button, we defined a class to it. This class will be used to make that button functional. Let’s do that:
Add the below code at this location
app\code\WebArchers\DirectUpload\Block\Adminhtml\Product\Edit\AddModelButton.php
<?php

namespace WebArchers\DirectUpload\Block\Adminhtml\Product\Edit;

use Magento\Framework\View\Element\UiComponent\Control\ButtonProviderInterface;

class AddModelButton implements ButtonProviderInterface
{
    public function getButtonData()
    {
        return [
            'label' => __('custom button'),
            'class' => 'action-secondary',
            'data_attribute' => [
                'mage-init' => [
                    'Magento_Ui/js/form/button-adapter' => [
                        'actions' => [
                            [
                                'targetName' => 'product_form.product_form.test_model',
                                'actionName' => 'toggleModal'
                            ]
                        ]
                    ]
                ]
            ],
            'on_click' => '',
            'sort_order' => 10
        ];
    }
}
That’s it.
Run these commands after:php bin/magento s:upphp bin/magento s:d:cphp bin/magento c:c
That’s all you need to do to make a sliding popup in Magento 2 admin section.
Let me know if you have any questions or doubts. I am happy to help you.
If you are able to add a button by this code, leave a comment that says- “Completed” to appreciate your efforts and yourself.
Read Also: How to Create a Popup Minicart in an E-Commerce Site Using Magento 2